
Once you've defined your electric fencing needs it's time to do some planning. This includes designing the layout, determining what components you will need, and what you will need to do to prepare for building your fence.
Without taking time to plan, you could end up short on materials or blow through your installation budget. That’s why you need to do these eight things before beginning installation:
- Check local fence laws and consult your neighbors
- Look into available tax credits and rebates
- Draw your fence plan
- Check maps and boundary lines
- Determine your fence length
- Pick components for the system
- Gather all the needed tools
- Plan for your specific livestock needs
1) Fencing Laws & Consultations with Neighbors: Know the Rules of the Land
Investigate your local, county, and state fencing laws. Become familiar with fencing laws in your area and know your legal rights and responsibilities. Your local cooperative extension office may be your best resource for fencing law information.
Due to the potential for conflicting views, it's important to consider the impact of your fence on neighboring landowners. Discuss your plans with them, especially for perimeter or boundary fences.
2) Check for Tax Credits: Save Money in the Long Run
We all know farm fencing is a major investment. For some operations, cost-share opportunities through government programs may be an option. Consult your local Soil and Water Conservation District or the Natural Resources and Conservation Service (NRCS) on the availability of cost-share fund and tax credits for fencing and water delivery systems.
3) Sketch It Out: Know What to Expect for Your Electric Fence Installation
It's beneficial to sketch out the area you are fencing, noting distances. Then draw locations of buildings or barns that will be adjacent to or enclosed by the fence.
As you develop your electric fence installation plan, map out locations of:
- Buildings, barns and sheds
- Cross fences and pens
- Electric outlets
- End posts
- Feed bunks
- Fence chargers
- Gates to be added
- Property borders
- Shelters and shelter belts
- Trees
- Water lines
- Wet areas
Check out our Zareba Installation Guide to help you with this process.
4) Boundaries and Topography: Maps Are a Big Help
Aerial photographs of your farm are probably the most valuable fence planning tool and can help to establish field boundaries for pastures. In addition, topographical maps can provide valuable information on the contour and slope of the land you will be installing your fence on.
Aerial maps are commonly available from NRCS or the USDA’s Farm Service Agency (FSA) office in your area. Topographical maps can also be obtained from NRCS.
Another option in electric fence installation is using Google Earth. This satellite mapping program doesn’t show property lines, but it will help you better understand the various features of your land.
5) Determine Perimeter Length: How Long is Your Fence?
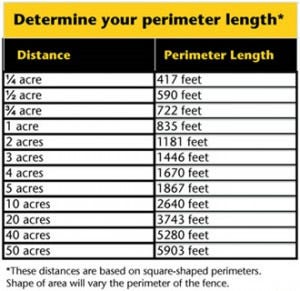 An accurate measurement of how much fencing you’ll need is vital for your plan. The more accurately you make your measurement, the more confident you’ll be when ordering your supplies. Under-ordering will create installation delays. Over-ordering is going to hurt your budget.
6) Choose System Components: Get Ready to Order
When your sketches and fence measurements are complete, you’re ready to select components for your system. For more information on the functions of each component, please see the electric fence supplies section of our fencing guide, where you can determine your options for:
- Fence chargers, including solar power, A/C power as well as options for steel cabinets.
- Fence posts, including step-in, fiberglass, steel, pigtail, and garden posts.
- Fence wire, including aluminum, high tensile and insulated wires. Poly selections are also available, including poly rope, poly tape, and poly wire.
- Fence insulators, including dozens of styles for every need.
- Gate options, that let you enter and exit your paddocks easily.
7) Get Fence Tools and Equipment: General and Specialized Tools
The fencing tools and equipment you need for installation vary from standard farm tools to specialized items. Some are made specifically for electric fence installation, while others will help you maintain your electric fence for years to come.
Among the tools you will need are:
- Post hole digger and/or a T-post driver
- Phillips and standard screwdrivers
- String line
- Cordless drill
- Scissors
- Shovel
- Hammer
- Tape Measure
- Level
- Protective gloves, eyewear and clothing

8) Prep It: Customize Your Fence to Your Livestock
Review the wire options needed for the type of fence you are building and the purpose for which you are installing it. Your fence should be customized to those purposes, whether it’s a deterrent fence or a containment fence.
For livestock, you will want to position one electrified wire at the animal’s shoulder height; this will cause it to hit the fence with its nose, making it back up. Height and spacing of the wires will vary based on the size of the animal(s) you are containing.
Are You Ready for Your Electric Fence Installation?
Before beginning your installation, are there any lingering questions about your electric fence installation? Ask us in the comments below or the next time you visit Zareba® Systems on Facebook. Be sure to subscribe to the Zareba® Systems E-Newsletter for special announcements and more helpful information on fencing installation and supplies.


